# Add Translations For Content

## 🎐 Which Features Have This Translation Feature

* Badges
* Banners&#x20;
* Trust Badges
* Tooltips

## ✨ Step 1: Preparations - Set Up Languages in Shopify

*<mark style="color:$primary;">**(Skip this step if you've already configured multiple languages on your store.)**</mark>*

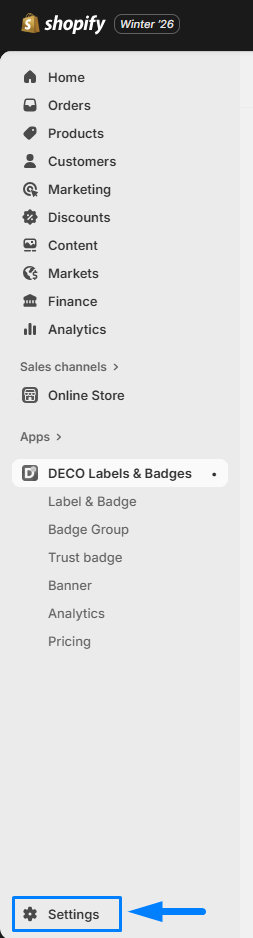
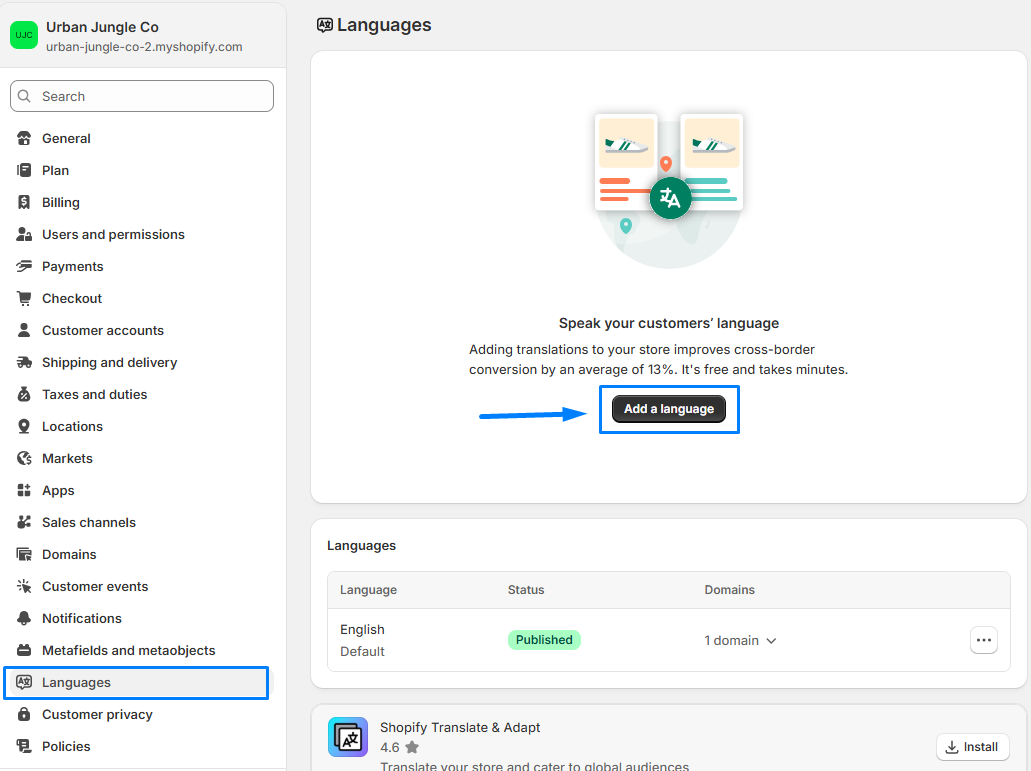
#### 1/ Access Language Settings

* Navigate to *<mark style="color:$primary;">**Settings**</mark>* in the bottom-left corner of your *<mark style="color:$primary;">**Shopify admin**</mark>*

<figure><img src="/files/fQmK1LHtFxzdpTWZMT3s" alt=""><figcaption></figcaption></figure>

#### 2/ Add Your Desired Languages

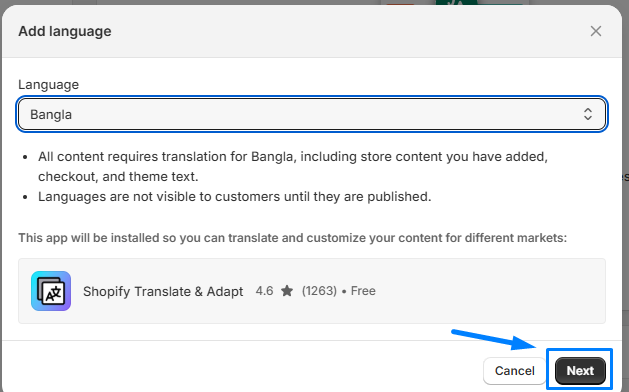
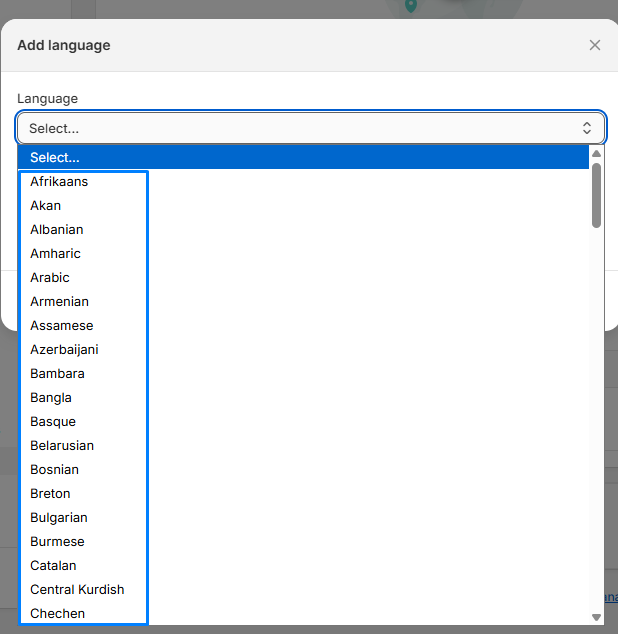
* Click on *<mark style="color:$primary;">**Languages**</mark>* >> *<mark style="color:$primary;">**Add a language**</mark>*
* *<mark style="color:$primary;">**Select the language(s)**</mark>* you want to display on your website
* Click *<mark style="color:$primary;">**Next**</mark>* to proceed

<div><figure><img src="/files/OadRT5wLufpvgfEQII6F" alt=""><figcaption></figcaption></figure> <figure><img src="/files/4mbvGWciIgG2Q73mmCRD" alt=""><figcaption></figcaption></figure></div>

<figure><img src="/files/0atlCUukt0dqwwoWncIE" alt=""><figcaption></figcaption></figure>

#### 3/ Enable and Publish

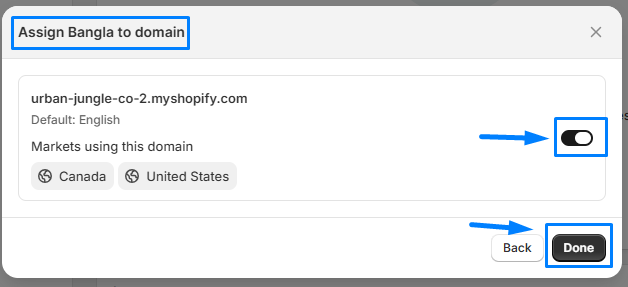
* Toggle the button to enable each language
* Click **Done**

<figure><img src="/files/rbg6AZkCahkPcn4VBlSR" alt=""><figcaption></figcaption></figure>

{% hint style="info" %}
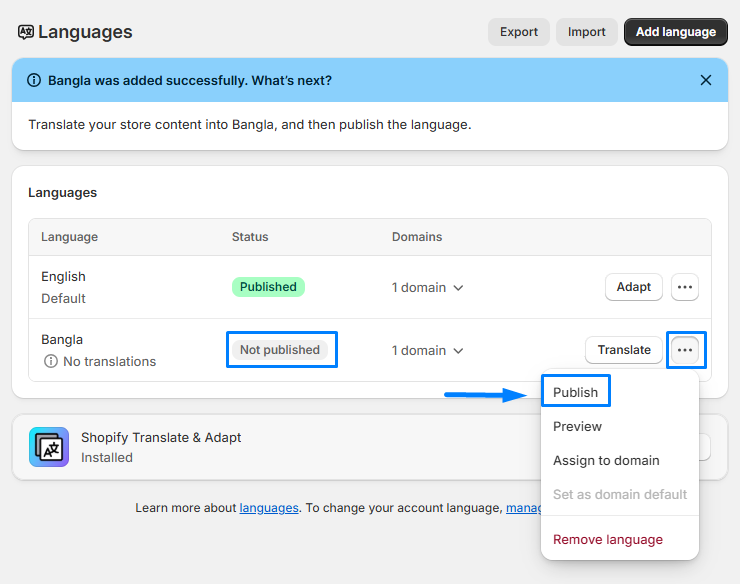
**Important:** Your new languages will be in the status *<mark style="color:blue;">**"Not published"**</mark>* —don't forget to *<mark style="color:blue;">**publish them to make them live on your store**</mark>*
{% endhint %}

<figure><img src="/files/DIgefG2Q4jQdeXjX03cd" alt=""><figcaption></figcaption></figure>

## ✨Step 2: Processing - On the DECO app

⇒ Now for the final step: Select your language(s) and add translations for your DECO badges, banners, and trust badges.

{% hint style="success" %}
Adding translations is <mark style="color:blue;">**available for all**</mark> DECO features, including: <mark style="color:blue;">**BADGE, BANNER, TRUST BADGE**</mark>
{% endhint %}

### 1. Access Created Badges/Banners/Trust Badges

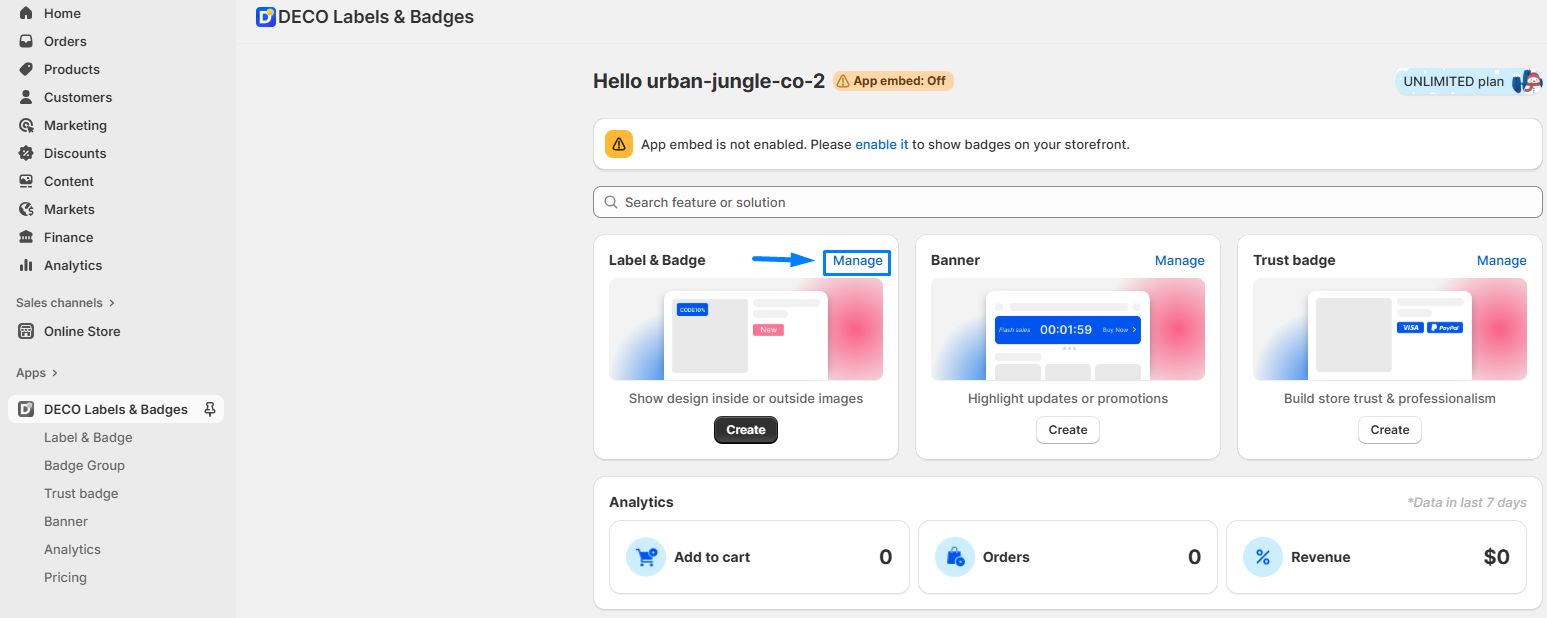
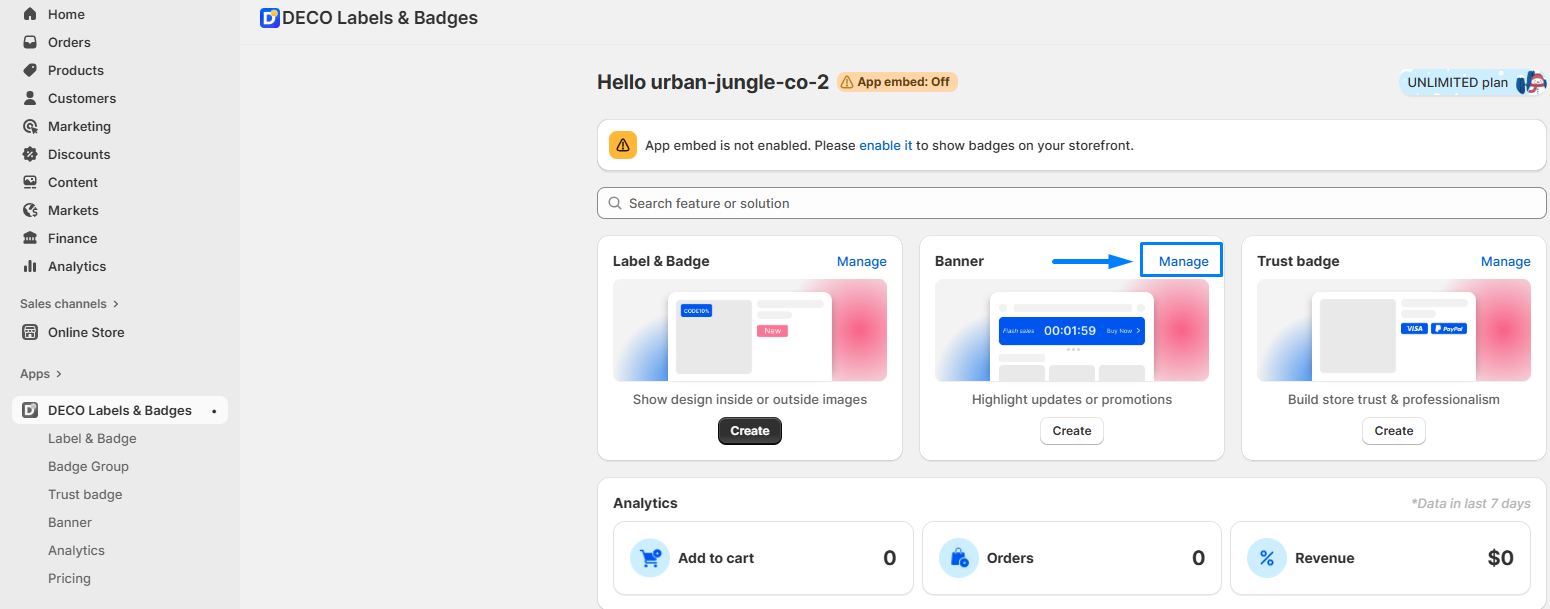
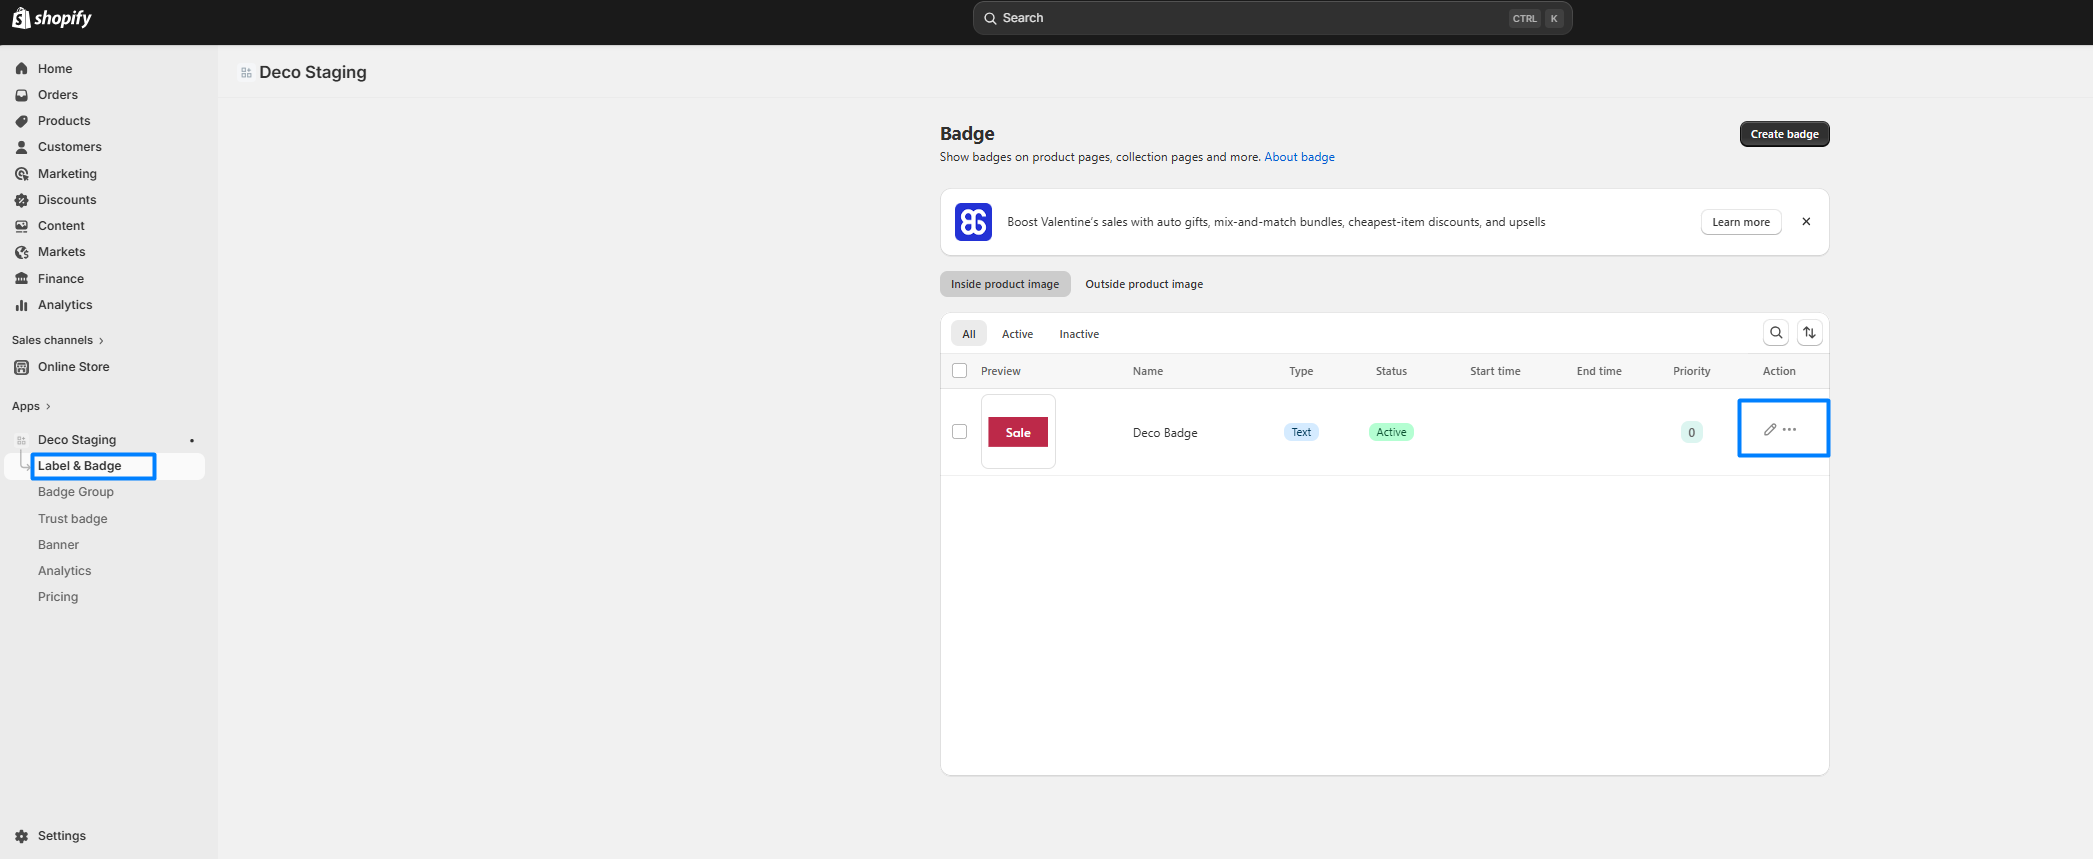
* *<mark style="color:blue;">**Open Created Badges (Only Available For TEXT BADGE)**</mark>*

<figure><img src="/files/Ym4RQ9EdguxNzcvIyDHv" alt=""><figcaption></figcaption></figure>

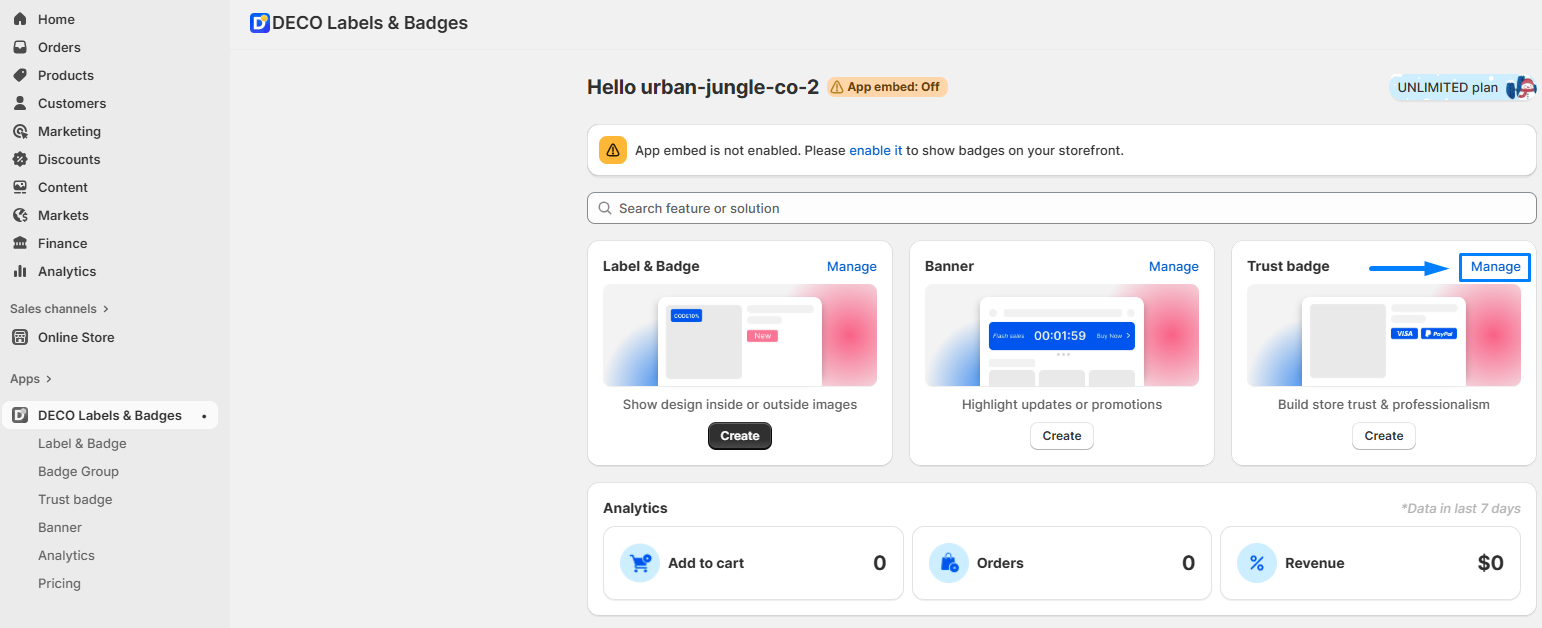
* *<mark style="color:blue;">**Open Created Banner**</mark>*

<figure><img src="/files/mzeD4BCu0REy1Rav5jWC" alt=""><figcaption></figcaption></figure>

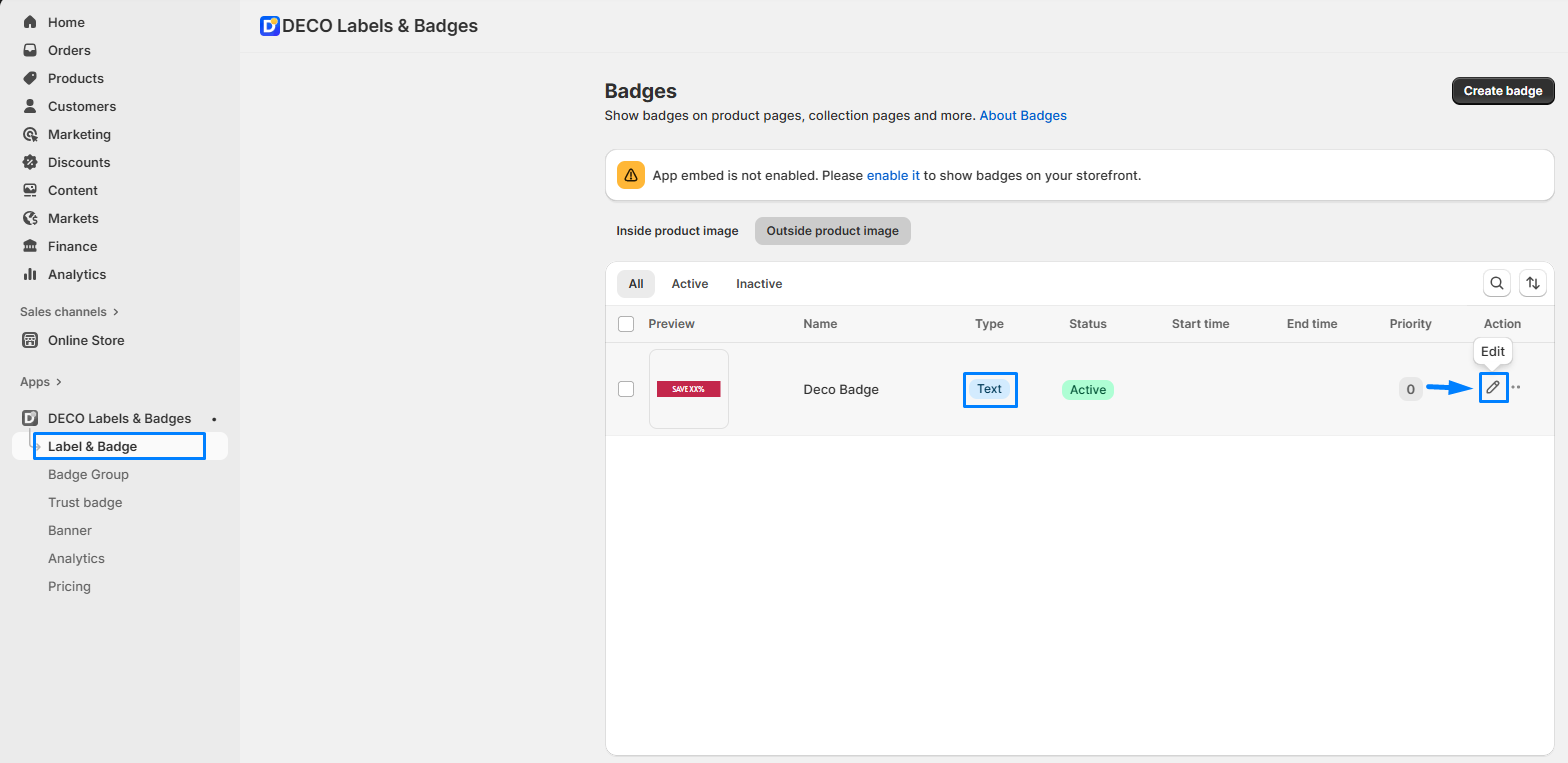
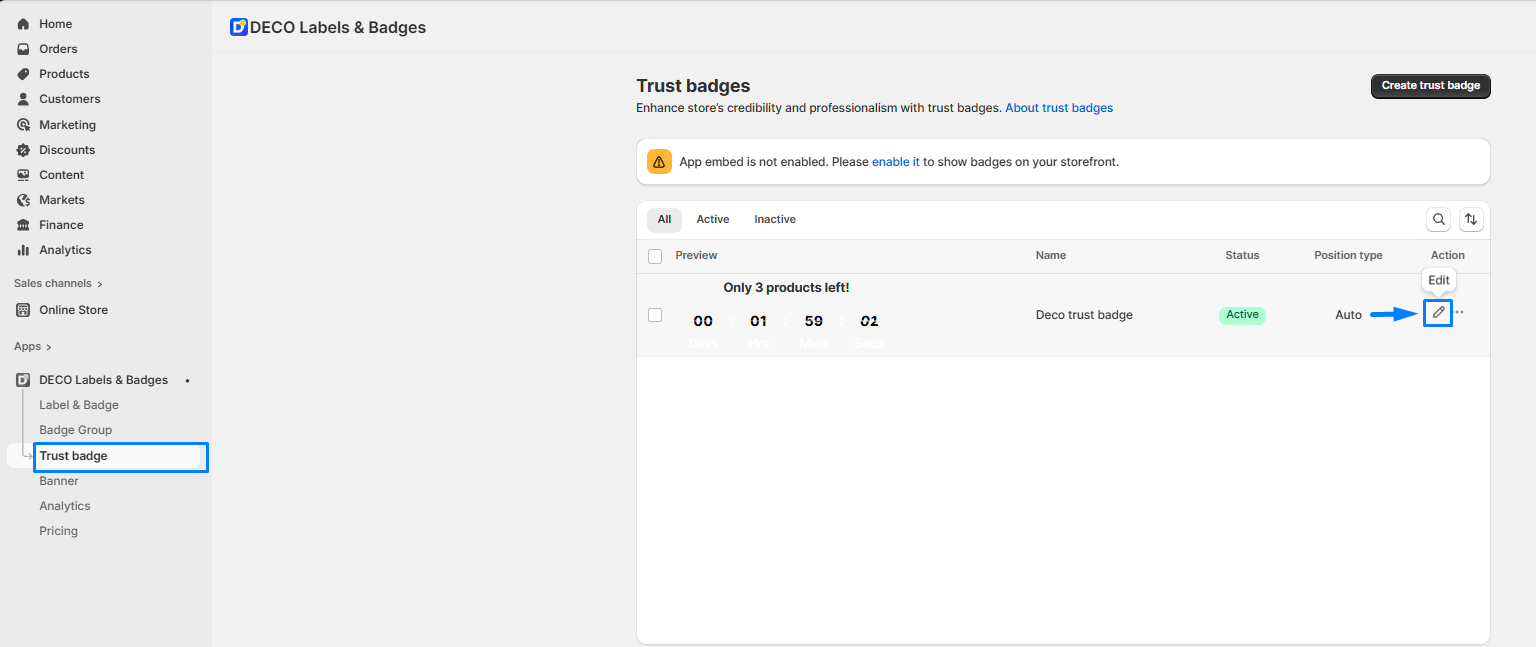
* *<mark style="color:blue;">**Open Created Trust Badge**</mark>*

<figure><img src="/files/36XRAxjMDJ7IVtoKWQzZ" alt=""><figcaption></figcaption></figure>

### 2. Add Translations For Content

*<mark style="color:blue;">**To provide a localized experience, follow the steps below for each feature type.**</mark>*

#### 🏅 For Badges:&#x20;

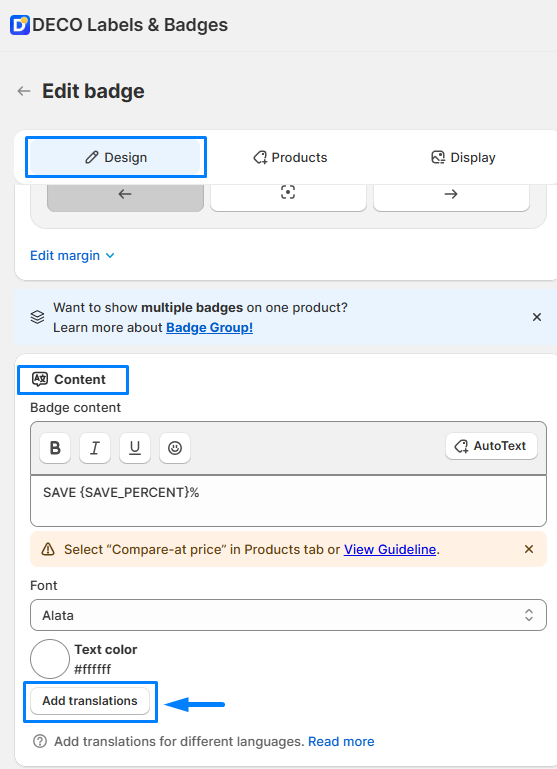
* Click the *<mark style="color:$primary;">**pencil icon**</mark>* to *<mark style="color:$primary;">**open**</mark>* your selected badge.

<figure><img src="/files/vgPWH2PwGid4FjWc7jPX" alt=""><figcaption></figcaption></figure>

* Navigate to the *<mark style="color:$primary;">**Design tab**</mark>* and find the *<mark style="color:$primary;">**Content**</mark>* section.
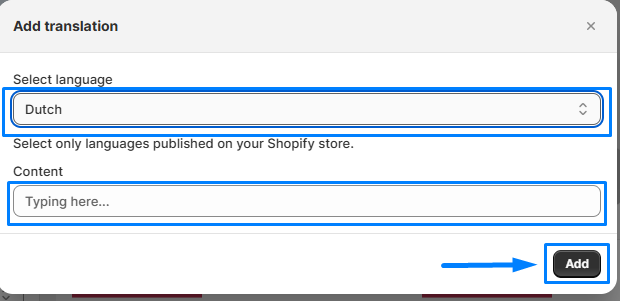
* Click *<mark style="color:$primary;">**"Add translations"**</mark>* and *<mark style="color:$primary;">**select**</mark>* your *<mark style="color:$primary;">**target language.**</mark>*
* *<mark style="color:$primary;">**Enter**</mark>* *<mark style="color:$primary;">**your translated text**</mark>* and click "*<mark style="color:$primary;">**Add"**</mark>*.

<div><figure><img src="/files/0jmZnOPslhG7yF1DZvx6" alt=""><figcaption></figcaption></figure> <figure><img src="/files/cZO0QdJYTZ0xdATygJVQ" alt=""><figcaption></figcaption></figure></div>

#### 🚩 For Banners:&#x20;

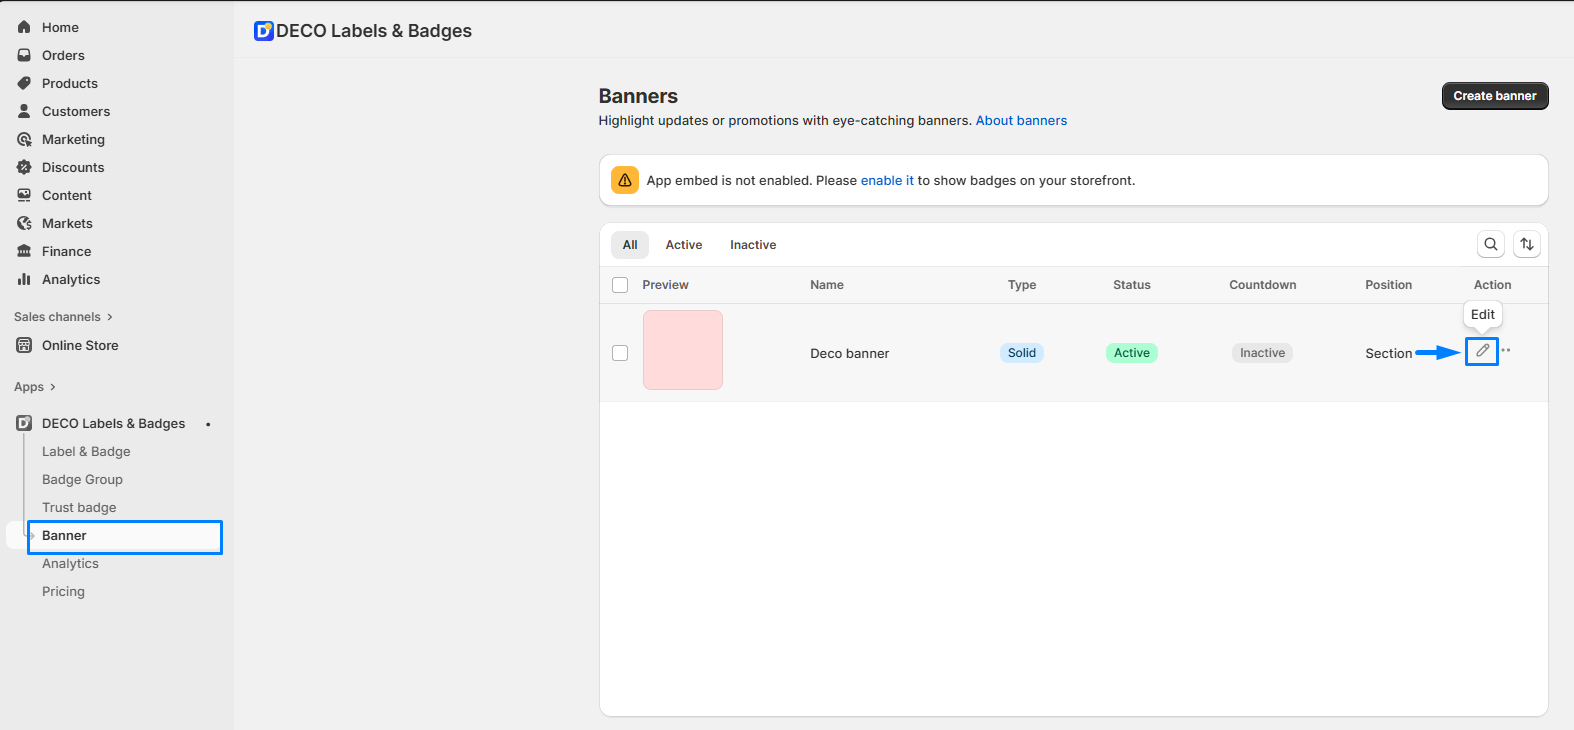
* Click the *<mark style="color:$primary;">**pencil icon**</mark>* to *<mark style="color:$primary;">**open**</mark>* your selected banner.

<figure><img src="/files/8CjPw2I4TEs9yIuiigYa" alt=""><figcaption></figcaption></figure>

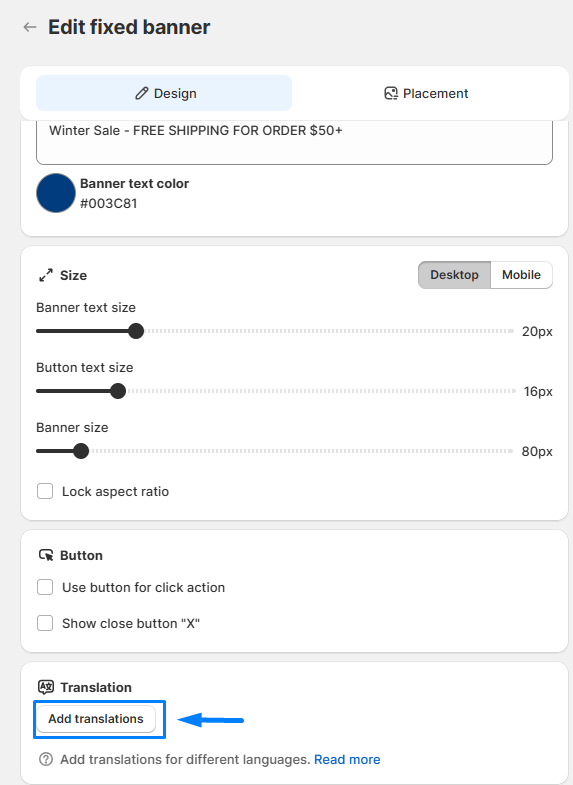
* In the *<mark style="color:$primary;">**Design tab**</mark>*, scroll to the bottom to find the *<mark style="color:$primary;">**Translation**</mark>* section.
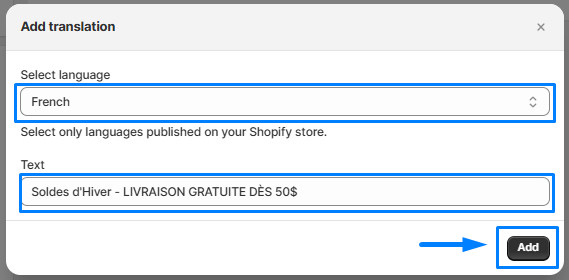
* Click *<mark style="color:$primary;">**"Add translations"**</mark>**,*** select a language, and enter your text.
* Click *<mark style="color:$primary;">**"Add"**</mark>* to save.

<div><figure><img src="/files/MnYMGtXVqaYWNF0dcqqj" alt=""><figcaption></figcaption></figure> <figure><img src="/files/giwndQYyy72eapRBjLsg" alt=""><figcaption></figcaption></figure></div>

#### 🛡️ For Trust Badges:

* Click the *<mark style="color:$primary;">**pencil icon**</mark>* to *<mark style="color:$primary;">**open**</mark>* your selected trust badge.

<figure><img src="/files/bRtQ5PEQLeWAKVdyFSO1" alt=""><figcaption></figcaption></figure>

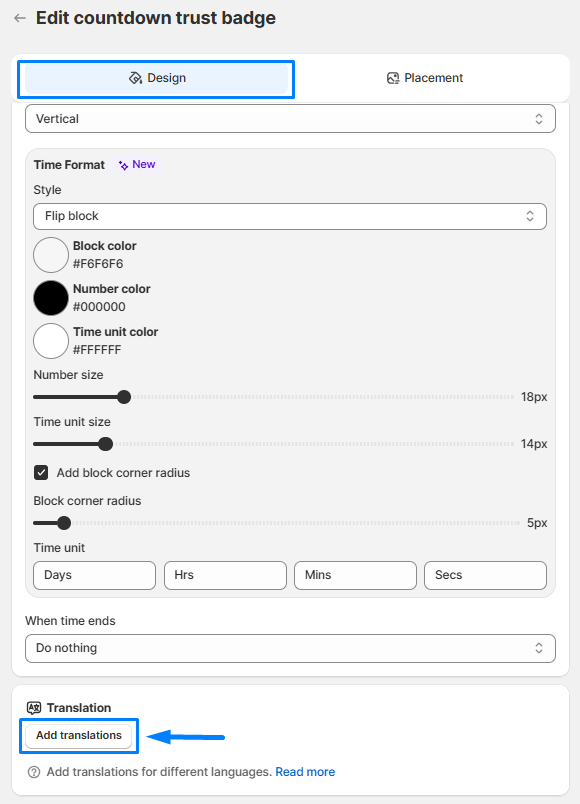
* In the *<mark style="color:$primary;">**Design tab**</mark>*, scroll to the bottom to find the *<mark style="color:$primary;">**Translation**</mark>* section.
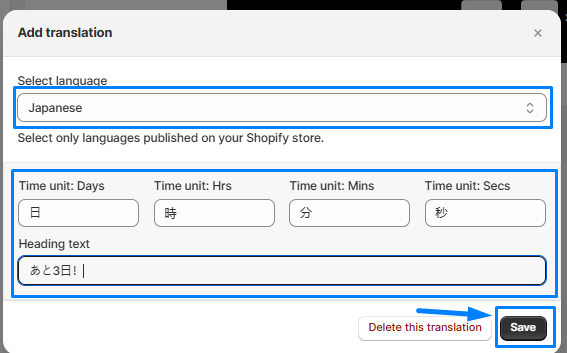
* Click *<mark style="color:$primary;">**"Add translations"**</mark>**,&#x20;**<mark style="color:$primary;">**select your language**</mark>*, and *<mark style="color:$primary;">**type the translation**</mark>*.
* Click *<mark style="color:$primary;">**"Add"**</mark>* to finish.

<div><figure><img src="/files/CrAoQ43lzLKmeXvyiHJn" alt=""><figcaption></figcaption></figure> <figure><img src="/files/XLtsLB9ozWrxB9LFlrCP" alt=""><figcaption></figcaption></figure></div>

#### 🛡️ For Tooltips:&#x20;

Click the *<mark style="color:$primary;">**pencil icon**</mark>* to *<mark style="color:$primary;">**open**</mark>* your selected badge.<br>

<figure><img src="/files/ajhNskRsYV25dbOOKhRn" alt=""><figcaption></figcaption></figure>

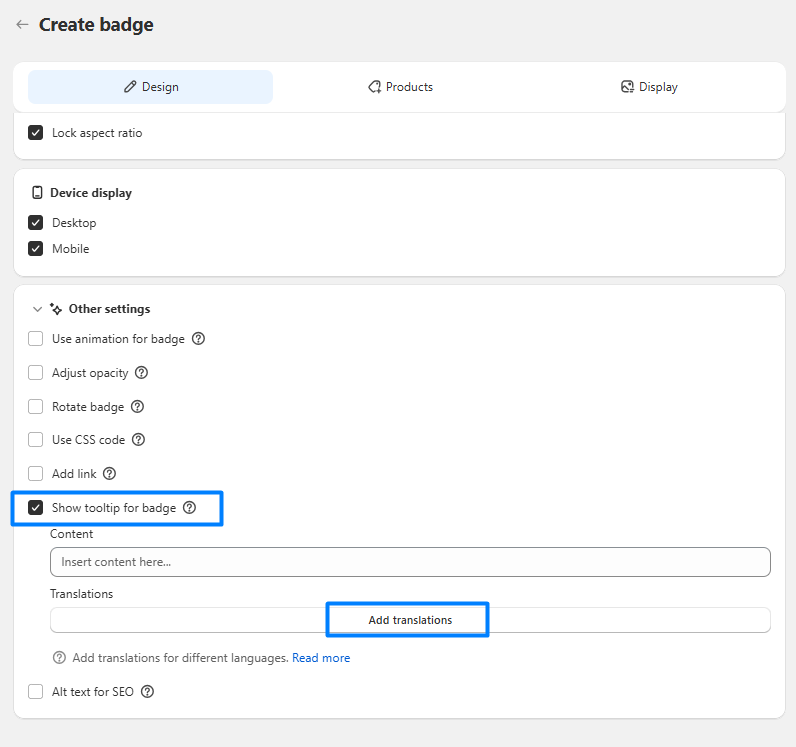
In the *<mark style="color:$primary;">**Design tab**</mark>*, scroll to the bottom to find the *<mark style="color:$primary;">**Other Settings**</mark>* section.

* Here choose *<mark style="color:purple;">**Show tooltip for badge**</mark>*
* Click on *<mark style="color:purple;">**Add translations**</mark>*

<figure><img src="/files/J0of1jqpuH8YnWCaYbYL" alt=""><figcaption></figcaption></figure>

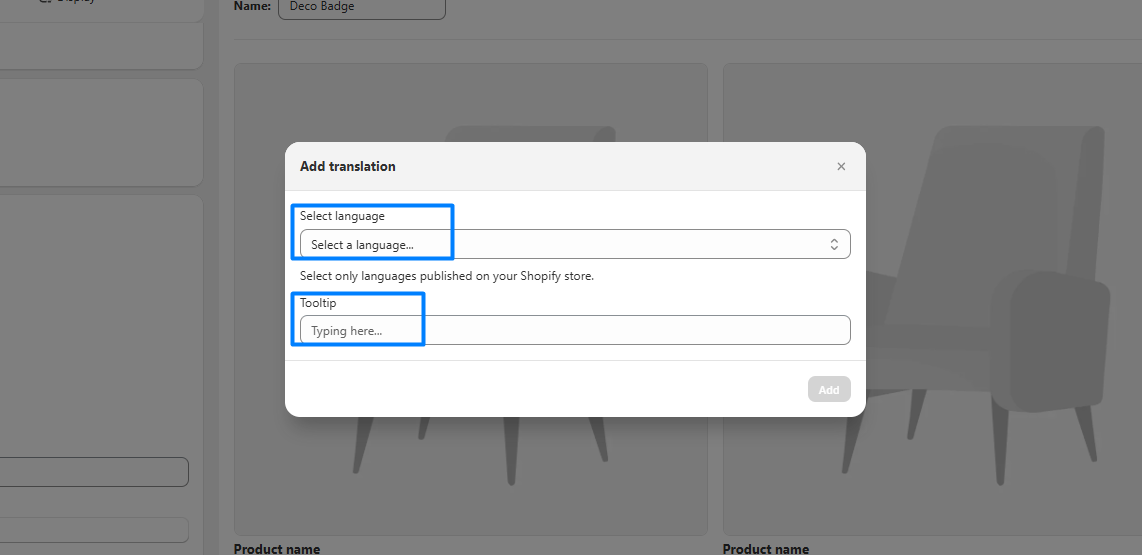
Here you can ***select your language*** and type the ***tooltip*** that you want.

<figure><img src="/files/zr6xN0PWSKR0PwAZHpwf" alt=""><figcaption></figcaption></figure>

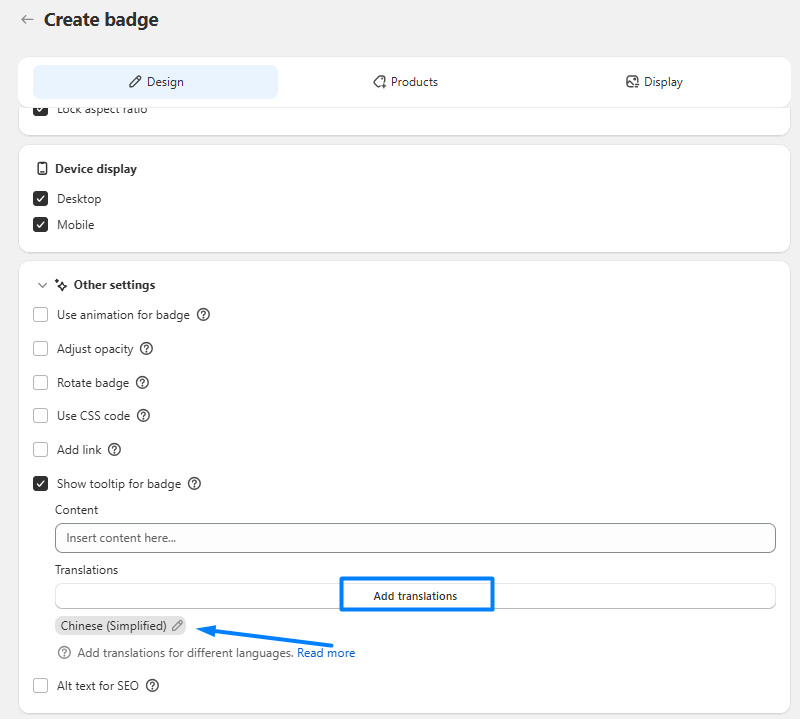
You can ***add as many translations*** as you want and also ***edit*** them here:&#x20;

<figure><img src="/files/SSCqaTvxId9WQCsf9Gi4" alt=""><figcaption></figcaption></figure>

*All done!* 🎉 If you have any questions or need a hand, click the chat icon below for instant support. [***Chat here***](http://go.crisp.chat/chat/embed/?website_id=17e47fa7-bddf-4074-b627-df66a29a740e) ***😎***
---

# Agent Instructions: Querying This Documentation

If you need additional information that is not directly available in this page, you can query the documentation dynamically by asking a question.

Perform an HTTP GET request on the current page URL with the `ask` query parameter:

```
GET https://deco-product-labels-and-badges-1.gitbook.io/deco-guidelines/our-special-features/add-translations-for-content.md?ask=<question>
```

The question should be specific, self-contained, and written in natural language.
The response will contain a direct answer to the question and relevant excerpts and sources from the documentation.

Use this mechanism when the answer is not explicitly present in the current page, you need clarification or additional context, or you want to retrieve related documentation sections.